the-vsan-build-part-2
I got the final parts (well enough to boot strap things) on Thursday so the building has begun.
A couple quick observations on the switch, and getting VSAN up and ready for vCenter Server.
NetGear XS712T
1. Just because you mark a port as Untagged doesn’t mean anything. To have your laptop be able to manage on a non-default VLAN you’ll need to setup a PVID (Primary VLAN ID) to the VLAN you want to use for management. Also management can only be done on a single IP/VLAN so make sure to setup a port with a PVID on that VLAN before you change it (otherwise its time for the reset switch).
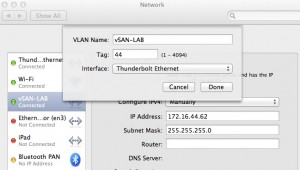
2. Mac users should be advised that you can tag VLAN’s and create an unlimited number of virtual interfaces even on a thunderbolt adapter. Handy when using non-default VLANs for configuration. Click the plus sign in the bottom left corner of the network control panel to make a new interface, and then select the gear to manage it and change the VLAN.
3. It will negotiate 10Gig on a Cat5e cable (I’m going to go by Fry’s and get some better cables at some point here before benchmarking).
VSAN/VCenter.
Its trivial to setup a single host deployment.
First create the VSAN.
esxcli vsan cluster join -u bef029d5-803a-4187-920b-88a365788b12
(Alternatively you can go generate your own unique UUID)
Next up find the NAA on a normal disk, and a SSD by running this command.
esxcli storage core device list
Next up add the disks to the VSAN.
esxcli vsan storage add -d naa.50014ee058fdb53a -s naa.50015178f3682a73
After this you’ll want to add a VMkernel for VSAN and add some hosts, but with these commands you can have a one node system up ready for vCenter Server installation in under 15 minutes.
For this lab I’ll be using the vCenter Server Appliance.
After installing the OVA you’ll want to run the setup script. You will need to first login to the command line interface. Mac users be warned, mashing the command key will send you to a different TTY.
The login is root/vmware. From the console run the network setup script. /opt/vmware/share/vami/vami_set_network
It can be run with parameters attached to more quickly setup.
/opt/vmware/share/vami/vami_set_network eth0 STATICV4 172.16.44.100 255.255.255.0 172.16.44.1
After doing this you can login in your browser using HTTPS and port 5480 and finish the setup. Example (https://172.16.55.100:5480).


