Parts are starting to roll in for this and next weeks new project. A VSAN to take over our old lab. The SMS was getting long in the tooth, and the remaining servers where either too old, or had been hijacked for the internal VDI environment. We have been aware of this project for a few years now and have been partly sandbagging a major lab overhaul while waiting on a firm release date for this project. VMware has put out a call to arms on testing the new product and we really wanted to put it through its paces before its available to our customers.
Here’s the initial hardware spec’s (Subject to change based on things not working, or Ingram sending me the wrong part).
For Server I have three of the following
ASUS RS720-X7/RS8 2U
Intel Ethernet Converged Network Adapter X540-T1
ASUS PIKE 2008 (8 port LSI)
3 x SAMSUNG 16GB 240-Pin DDR3 SDRAM ECC Registered DDR3 1333
Intel Xeon E5-2620 Sandy Bridge-EP 2.0GHz (2.5GHz Turbo Boost) 15MB L3 Cache LGA 2011 95W Six-Core
6 x Intel RED 2TB 5400RPM SATA drives.
1 x Intel 240GB DC S3500 SSD flash drives.
For switching I have one of the following
NetGear XS712T 12 x 10Gbps RJ-45 SmartSwitch
Here’s the justification for the parts chosen, and thoughts on if this was to be more than a lab where to upgrade.
1. The Server. This was pretty much one of the cheapest 8 drive servers money could buy. Honestly Supermicro would have been a consideration except their HBA was more expensive. LFF was also a design requirement (Lab has a high capacity low IOPS need), and 8 drives was the target. 4 x 1Gbps on-board NIC’s (and a 5th for IPKVM) isn’t a bad thing to be bundled. 2RU was a requirement as it opened up additional options for FC/PCI-Flash-SAS expansion trays etc. My only complaint is the lack of an internal SD card slot. Personally I don’t enjoy 1RU pizza box servers in the lab as the fans spin a lot louder. If this was a production system wanting tier 1 hardware, a Cisco C240M3 or a Dell 720XD would be good options.
2. The Memory – Its cheap, and 144GB of RAM across the cluster should be enough to get me started. Down the road we may add more. If this was a production setup I likely wouldn’t see anything less than 128GB or 192GB per host.
3. The CPU – Our lab loads are relatively light, but I wanted something modern so I would have a baseline for VSAN CPU usage. As we scale up and need more memory slots I suspect we’ll end up putting a second CPU in. I wanted something that on reasonable VDI composer and other testing could give me a baseline so I will know how to scale CPU/Memory/IOPS ratio’s going forward.
Drives piling up!
Drives piling up!
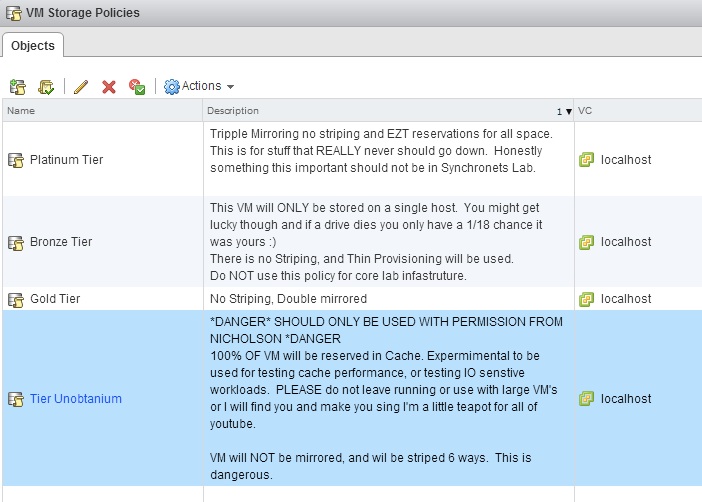
4. The Drives – Our lab generally has a LOT of VM’s sitting around doing nothing. Because of our low IOP/GB ratio I’m violating the recommendation of 1:10 Flash to normal spinning disk. WD Reds where chosen for the cheapest price possible, while still having proper TLER settings that will not cause them to drop out randomly and cause rebuild issues. They are basically prosumer grade drive, and if this lab had anything important I would upgrade to at least a WDRE4, Hitachi UltraStar, or Seagate Constellation NL-SAS drives. If this was production I’d likely be using 10K 900GB drives as the IOPS/capacity ratio is quite a bit better. A huge part of VSAN, CBRC, vFLASH and VMware’s storage policy engine is separating performance from capacity, so I”m going to likely push flash reservations and other technologies to their limits. The flash drives chosen where Intel DC S3500 as Intel has a strong pedigree for reliability, and the DC series introduces a new standard in consistency. Even full and under load they maintain consistent IOPS. While the 3500′s endurance is decent, its not really designed for large scale production write logging. If building a production system, 3700 or even the PCI based 910 Intel drives would be a much better selection for more than just the obvious jump in performance.
5. The Network – I’m sure everyone looking at the model numbers is supremely confused. The selection really boiled down to me wanting to test more than just the VSAN and do it on a budget. I wanted to test 10Gbps RJ-45, SR-IOV, Intel CNA’s, without spending 10K on Nic’s and switches and cables. Even going to Ebay for used Arista switches wasn’t going to keep the budget low enough. Netgear’s $1500 switch, delivers $125 ports with no need for GBIC’s, and Intel’s CNA’s pack a lot of features for a third the price of its optical cousins. I’ll admit the lack of published PPS specs, and anemic buffers may come back to haunt me. I can fall back on the 5 GigE nics and my old GigE switching if I need to, and this was all too cheap to not take a pass at. For a production upgrade (and possibly to replace this thing) I would look at least a Brocade 6650 (Billion PPS) switch or maybe even a VDX 6720 if I’m wanting something a little more exciting.